Configure default Explorer Tree settings
You can define the way the Explorer Tree appears by default, which allows users to customize their Explorer Tree options.
Organization and Project Admins only
You need organization or project admin permissions for this task.
To configure default settings for Explorer Tree:
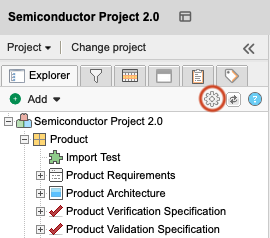
Select ADMIN > Project, then select the gear icon at the top of the Explorer Tree.
Select the Default settings tab, then select the settings to define the default Explorer Tree view.
Show item IDs — Displays the unique ID (as in PROJ-REQ-25) before each item.
Display global ID — Displays the global ID (as in GID-8845) before each item. This is helpful if the item is copied and synchronized.
Show only folders / hide items — Hides items from view in the Explorer Tree. Components, sets, and folders are still displayed.
Best Practice
Use this setting to improve performance when your project has a large number of items.
Show outline numbering — Displays a number scheme of order and depth in the Explorer Tree. Root-level items have numbers like 1, 2, or 3. Child items contain the parent item number as well as its own number, like 1.1, 1.2, or 1.1.5.
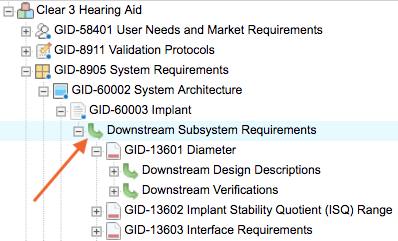
Show relationships in Explorer Tree — Displays downstream relationships of items in the Explorer Tree. Select the green downstream arrow to open the related items in List View.
Important
Don't relate items back to themselves to avoid an infinite loop that causes the Explorer Tree to expand.
Select Apply and Close.
These default settings are now available to users when they customize their Explorer Tree options.