Upload custom reports or exports
You can upload reports or exports so that other users can access them.
Important considerations
If uploading a Velocity or Office Template export that uses preselected (context-sensitive) data in the main project view, the exports appear under Exports > View all export options.
If uploading Velocity reports that pull data at a project or cross-project level, the exports appear under Reports in the Jama Connect header. For more information, read about Jama Connect and Velocity here.
Report criteria is unique to each report.
Tip
Before uploading a report or export, check with the person who created it about the best settings to use.
For templates with Microsoft Word or HTML formats, you can also export to PDF. For Velocity and HTML templates, PDF export results might vary.
For Office Templates, any user with a creator license can add a custom export, which appears under Export > View all export options.
To upload custom reports or exports:
To add or edit a report:
For Velocity or Office template reports, select ADMIN > Reports.
Select Add report in the top right corner.
In the Add/Edit Report window that opens, define the report. Available options depend on the type of report you choose.
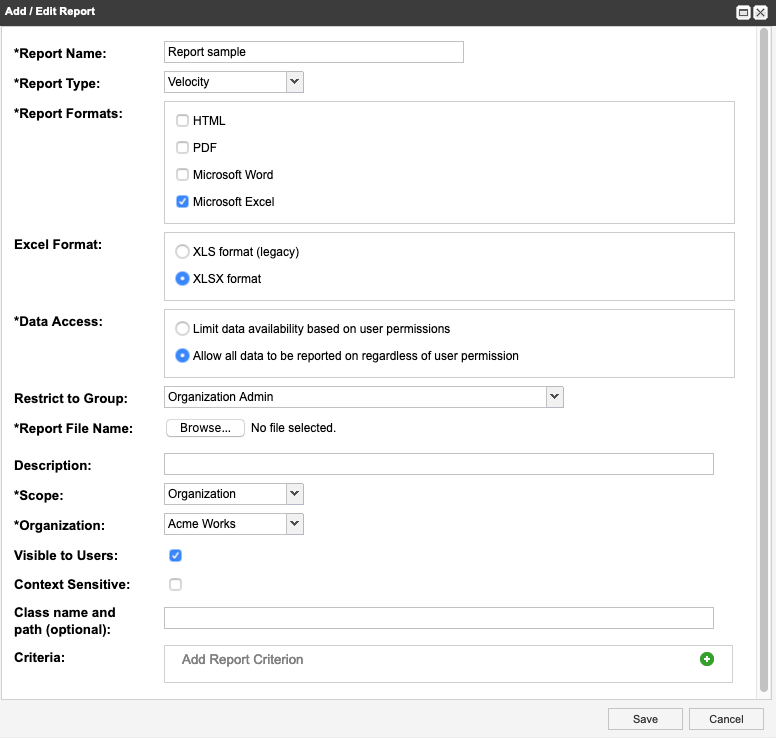
Report Name — Enter a name so that others can identify the custom report or export template.
Report Type — Select Velocity or MS Office Template.
Report Formats — Select HTML, PDF, Microsoft Word, or Microsoft Excel.
Excel Format — Select XLS format (legacy) or XLSX format.
Data Access — Select Limit data availability or Allow all data to be reported on regardless of user permission.
Restrict to Group — Select whether and how to limit access (by user permissions or user group) to run custom reports.
Report File Name — Select Browse and select the report or export template to upload. Velocity reports have file extension .vm.
Description — Enter an optional description to define the output.
Scope — Define whether the report or export template is available to all users (Organization) or only to users in a particular project (Project). Default for Jama Connect reports is System.
Organization — Select the organization from the drop-down menu.
Visible to Users — Select Visible to Users if you want other users to see the report.
Context Sensitive — Select Context Sensitive if you have an export that uses preselected (context-sensitive) data in the main project view.
This export appears in the window that opens when users select Exports > View all export options.
Class name and path — Enter the class name and path for custom plug-ins for Velocity reports. Otherwise, leave blank.
In the Criteria section, select + to add report criteria.
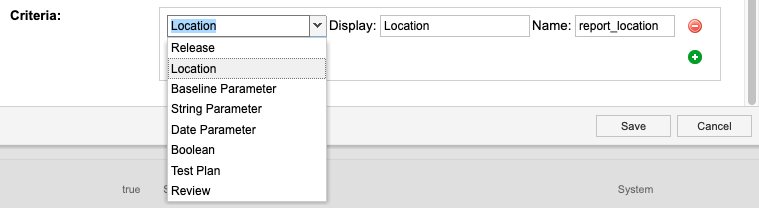
From the Select Parameter Type drop-down menu, select the type of data you want to include.
Release — Select the project release parameters as needed.
Location — Select a location for each parameter.
Baseline Parameter — Select one baseline for each baseline parameter.
String Parameter — Enter the string parameter.
Date Parameter — Enter the date.
Boolean — Select True or False. The value is sent to the reporting engine.
Test Plan — Select a test plan from the list of test plans in the selected project. Jama Connect passes the database ID to the report.
Review — Select a review from the list of reviews in the selected project. Jama Connect passes the ID to the report.
Under Display, enter the label you want users to see when publishing the report and exporting from Jama Connect.
Under Name, enter a unique case-sensitive name that is passed to the report or export template.
When you publish a report or export Jama Connect content, these parameters are displayed in alphabetical order by the name field, not in the order shown in the report setup screen.
Important
If you change the Name criteria, you must also change the reference to the criteria in your report or export template. Otherwise, the report or export template fails.
Select Save to upload the report or export template and save your changes.
The report or export is saved and appears in the Reports table.