Manage pick list values
A pick list can have multiple values, which can be organized, color-coded, and set as a default.
A value can include an optional infotip, which is custom text that provides additional context for that value.
Organization Admins only
You need organization admin permissions for this task.
Important considerations
Changing a pick list value — Might affect other fields if the value is included in a calculated field.
Archiving a pick list value — Removes the option from a selectable option, but preserves the historical selection of the value. Archived pick lists can't be unarchived.
Deleting a pick list value — Removes the selected value from all items in the system. Each item is versioned and updated with the replacement value. Previous versions retain the deleted value. The deleted value is no longer available for filtering. Each pick list must retain at least one value and that value can't be deleted. Deleting a value from a lookup matrix type pick list might require updating any dependent lookup matrices.
Selecting a pick list type — Use the default or standard pick list types unless the pick list is intended for configuring a lookup matrix.
To manage pick list values:
Select ADMIN > Organization > Pick lists, then select the pick list row you want to modify.
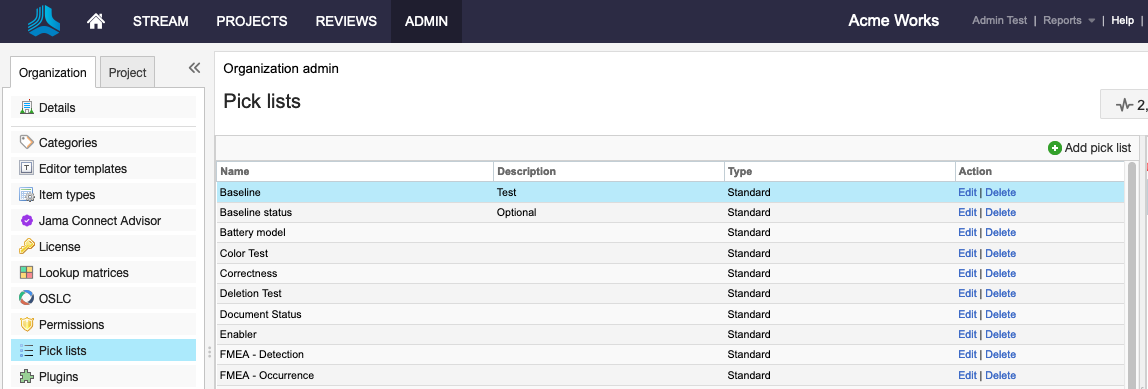
In the table, select the item row you want to modify, then select the icon for one of the following actions.
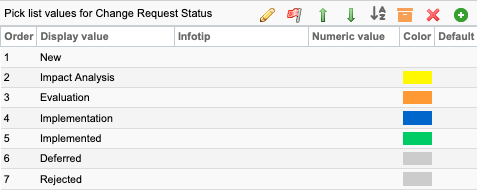
Plus icon (add item) — Enter the name and optional characteristics like infotip, description, value, and color.
Pencil icon (edit item) — Make your changes.
Box icon (archive item) — If you archive an item, the value's row is removed from view. This action can't be undone and is only visible on versions of items before it was archived.
X icon (remove item) — Select a replacement value, then select Delete.
The value is saved to items in the system where the deleted value is selected.
Select Save.
The table is updated to reflect your changes.