Add, edit, or delete fields
When editing an item type, you can add, change, or delete fields.
Note
You must have organization admin permissions to complete this task.
Important considerations
When you toggle a field between rich text and text, the text doesn't retroactively change data that was previously entered in that field. Each type is saved in a different format (HTML vs plain text). A large scale data translation isn’t supported — data might have accumulated over years and with potentially millions of records, so the update might break compliance rules, version history, integrations, or review comments.
Things to know before you delete a field:
Once a field is deleted from an item, all values related to that field are deleted from the database and can’t be recovered. The field and its existing values are deleted from this item type across projects, reviews, baselines, and versions. Affected items are re-indexed, which can take a while. This action can’t be undone.
If the field was used to relate synced items, such as JIRA KEY, proxy, a duplicate item is created if you try to create the sync again.
If the field is mapped in an integration, it is no longer updated and might cause errors in your integration tool.
If a filter used the field, update the filter before removing the field to avoid inaccurate filter results.
If the deleted field raised suspect links, relationships are affected. Because the field no longer exists, users can’t see the changes that created the suspect link.
If you try to restore a previous version of an item that still contains the deleted field, the field's contents aren’t restored. Even if you recreate the field before the version rollback, data isn’t restored.
If you still want to delete a custom field, consider exporting a copy of the field values via a report or the API.
To add, edit, or delete a field:
Select ADMIN > Organization > Item types.
A list of existing fields is displayed with information about each field.
Select a row to highlight it in blue, then select an action icon in the top toolbar.
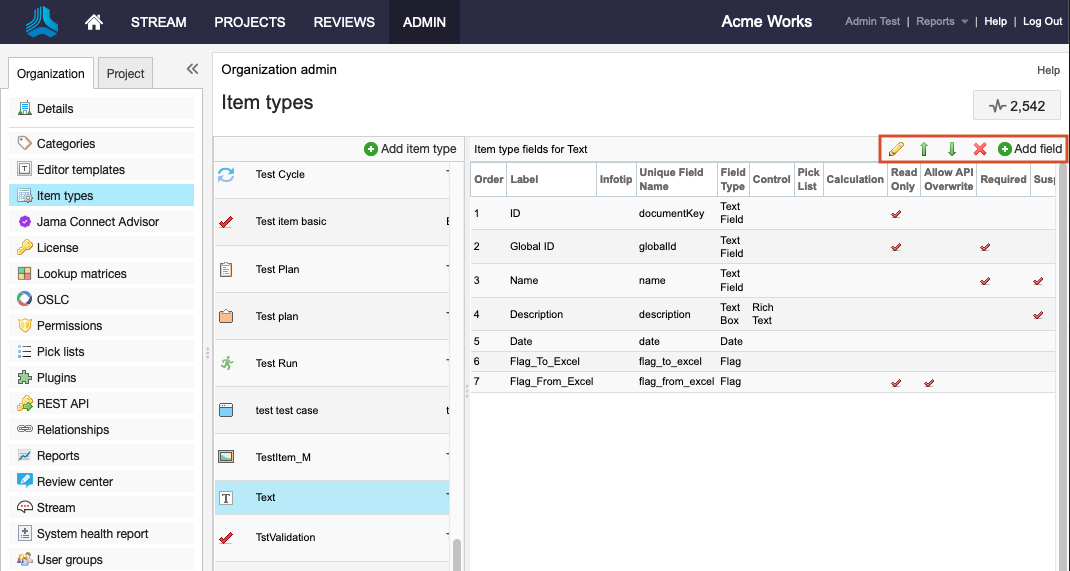
Action icons include:
Pencil — Edit a field
Green arrows — Re-order fields
Red X — Delete a field
Green Add field — Open the Add field window
If you selected Add or Edit, select Predefined Fields or Custom Fields, then use the drop-down list to select a field type.
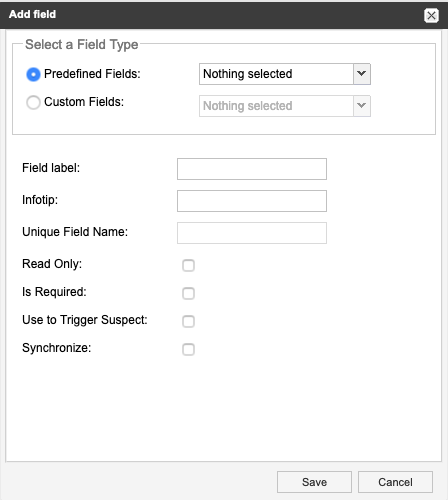
Both field types can be used in the same item type. (This section does not appear when editing fields).
Important
You can only use the system predefined Release field to show items in the Releases tab. If you use a custom Release field to designate an item to a release, that item doesn't appear in the Releases tab.
Complete these options to define or edit the field type:
Field label — The field name that users see. The application automatically uses this value as the unique field name in the database, which can’t be changed. Avoid leading with an underscore; some unique field names might conflict with OpenSearch fields (such as _source or _ID) and prevent proper functioning.
Infotip — (Optional) Visible to users when they hover over this field label.
Unique Field Name — The name of the field in the database, which the application uses automatically.
Read Only — Prevents users from editing the field.
Allow API overwrite — Fields that are configured to be read-only have the option to be editable via the REST API. System fields like modifiedDate or rollup don't allow the option to overwrite.
Is Required — Required fields are string, text or date fields that are configured so that the user must enter data into the field before saving an item.
Use to Trigger Suspect — Suspect links is triggered when specific fields update in an item. This option lets you determine which field changes flag an item as suspect.
Synchronize — When items are synchronized to other items, a change in a field with this checkbox flags this item as out of sync in the synced items window and in Single Item View.
Text Components — (Custom Fields > Text Box only) Choose whether you want rich-text capabilities.
Pick list, Multi-select, Calculated fields — If a field requires lookup or a pick list for input, add the pick list or lookup matrix.
Select Save.
By default, new fields are added to the bottom of the item type fields list, but you can reorder using the green arrows.